

How To Install Docker Image In Kubernetes
In this mail, we are going to see the Steps to create a Docker Image and Deploy to Kubernetes in eight like shooting fish in a barrel steps. This mail is about the title of this mail service which is "How to Deploy docker image to kubernetes"
For this mail, we have used minikube cluster and taken a Mac Desktop. Minikube can be installed in your Abode PC and you can attempt all these steps as you are reading it.
Steps to Deploy Docker Image to Kubernetes.
- Creating a Dockerfile
- Building an Paradigm from Dockerfile
- Validate if the Image is created and Listed
- Optionally upload to docker Hub to share with the world
- Start the Container from Paradigm
- Create Manifest file for kubernetes
- Build and Create a POD from Manifest file
- Validate and Monitor the POD creation
- Check the newly created POD in Kubernetes DashBoard
Step1: Creating Dockerfile
Creating of Dockerfile. The file is designed to run redis in-memory database in an alpine base OS
# Use existing docker image every bit a base FROM alpine # Download and install dependency RUN apk add together --update redis # EXPOSE the port to the Host OS EXPOSE 6379 # Tell the image what command it has to execute as it starts as a container CMD ["redis-server"]
Step2: Build an Image from Dockerfile
Build the Image using the Dockerfile nosotros take developed
aksarav@middlewareinventory: /apps/docker/redisserver$ docker build -t saravak/ redis . Sending build context to Docker daemon two.048kB Stride 1/4 : FROM alpine ---> 196d12cf6ab1 Step ii/4 : RUN apk add --update redis ---> Using enshroud ---> a1426a22089a Step 3/four : EXPOSE 6379 ---> Using enshroud ---> 7c0fde02a01c Pace 4/4 : CMD ["redis-server"] ---> Using cache ---> 8e1cc8b503d8 Successfully built 8e1cc8b503d8 Successfully tagged saravak/redis:latest aksarav@middlewareinventory: /apps/docker/redisserver$
Step3: Validate the image is created in docker images
Make certain the image is ready and listing in the docker images list
aksarav@middlewareinventory: /apps/docker/redisserver$ docker images REPOSITORY TAG Prototype ID CREATED SIZE saravak/redis latest 8e1cc8b503d8 nine hours ago vi.ixMB redis latest 0a153379a539 45 hours ago 83.4MB busybox latest 59788edf1f3e 46 hours agone 1.15MB tomcat latest 41a54fe1f79d 3 weeks ago 463MB alpine latest 196d12cf6ab1 3 weeks ago four.41MB
Step4: Upload to hub.docker.com
Upload the image to the hub.docker.com repository for global admission
aksarav@middlewareinventory: /apps/docker/redisserver$ docker login Login with your Docker ID to push and pull images from Docker Hub. If you don't have a Docker ID, head over to https://hub.docker.com to create one. Username: saravak Password: Login Succeeded aksarav@middlewareinventory: /apps/docker/redisserver$ docker push button saravak/ redis The push refers to repository [docker.io/saravak/redis] a63649d27e03: Layer already exists df64d3292fd6: Layer already exists latest: digest: sha256:dc0631a78737b5f0be09ad4c27b0120c916feb06d9bd7ce1fd6890925f5dd42b size: 739 aksarav@middlewareinventory: /apps/docker/redisserver$
Step5: Kickoff the container from image
Showtime the container using the Image we simply built just to make sure that the image tin can be instantiated every bit a container with no bug.
aksarav@middlewareinventory: /apps/docker/redisserver$ docker container run -d -it --name rediscontainer saravak/ redis:latest b9824eb84fd75fdf511149284db8fef4b1d03dce6be5e8527e38159b672f115c aksarav@middlewareinventory: /apps/docker/redisserver$ docker container list CONTAINER ID Epitome Command CREATED STATUS PORTS NAMES b9824eb84fd7 saravak/redis:latest "redis-server" 27 seconds agone Up 25 seconds 6379/tcp rediscontainer
Notation*: Till here you were Creating a Docker Image and working on Docker Control Line Interface.
As yous are entering into the Kubernetes Phase. I would like to Present you two Dissimilar options to Create a Kubernetes Container from your Docker Epitome aka Dockerfile.
The Second method is a Quick i where you Practise not take to write any Instructions similar YAML/JSON files and let Kubernetes do the difficult work for y'all,
On the other hand, The First Method is where you ascertain all the configuration elements on what Kubernetes should practice with your image
- Create Manifests and build things using Kubectl create command (Recommended)
- Deploy Docker Image to Kubernetes Rapidly with – Kubectl run command ( Deprecated)
You brand the pick.
Method1: Kubernetes Tasks with Manifest file
Step6: Create Manifest file for Kubernetes
Create a Manifest file to create a Elementary and Straight forward POD [Without replica and Scaling]
apiVersion: v1 kind: Pod metadata: name: redis-pod spec: containers: - proper name: redis-container01 paradigm: saravak/redis:latest ports: - containerPort: 6379
Step7: Build and Create POD from Manifest file
Create a POD using Kubectl command using the Manifest file we have created in Step6
aksarav@middlewareinventory: /apps/kubernetes$ kubectl create -f create-redispod.yml pod/redis-pod created
Step8: Validate the pod creation and observe more information
Get the status and more than detailed information on the newly created POD
aksarav@middlewareinventory: /apps/kubernetes$ kubectl become pods NAME READY STATUS RESTARTS AGE hello-minikube-7c77b68cff-pd4x2 1/ane Running 1 xih redis-pod 1/ane Running 0 2grand aksarav@middlewareinventory: /apps/kubernetes$ kubectl get pods/redis-pod NAME Set STATUS RESTARTS AGE redis-pod ane/1 Running 0 21000 aksarav@middlewareinventory: /apps/kubernetes$ kubectl describe pods/redis-pod Proper name: redis-pod Namespace: default Node: minikube/192.168.64.ii Showtime Fourth dimension: Thu, 04 October 2018 21:58:28 +0530 Labels: <none> Annotations: <none> Status: Running IP: 172.17.0.6 Containers: redis-container01: Container ID: docker://c7bc7ce68272493477249da617ea042ca5191b6b7b4ef89f9490dab8584e0fb4 Image: saravak/redis:latest Paradigm ID: docker-pullable://saravak/redis@sha256:dc0631a78737b5f0be09ad4c27b0120c916feb06d9bd7ce1fd6890925f5dd42b Port: 6379/TCP Host Port: 0/TCP State: Running Started: Thu, 04 Oct 2018 21:58:36 +0530 Ready: True Restart Count: 0 Environment: <none> Mounts: /var/run/secrets/kubernetes.io/serviceaccount from default-token-t5c7w (ro) Weather: Type Status Initialized True Fix True PodScheduled True Volumes: default-token-t5c7w: Type: Secret (a book populated by a Secret) SecretName: default-token-t5c7w Optional: simulated QoS Class: BestEffort Node-Selectors: <none> Tolerations: node.kubernetes.io/not-ready:NoExecute for 300s node.kubernetes.io/unreachable:NoExecute for 300s Events: Type Reason Age From Message ---- ------ ---- ---- ------- Normal Scheduled 2m27s default-scheduler Successfully assigned redis-pod to minikube Normal SuccessfulMountVolume twom27s kubelet, minikube MountVolume.SetUp succeeded for book "default-token-t5c7w" Normal Pulling iim26s kubelet, minikube pulling paradigm "saravak/redis:latest" Normal Pulled 2m20s kubelet, minikube Successfully pulled image "saravak/redis:latest" Normal Created 2m19s kubelet, minikube Created container Normal Started 2m19s kubelet, minikube Started container aksarav@middlewareinventory: /apps/kubernetes$
Method2: Quick Deployment of Docker Image with No Manifest
Step6: Create a Pod from Docker Image
In this step, we are instantiating our Docker Image as Container.
As you know the basic and the core element of Kubernetes is POD and that'south a logical group of one or more containers. A Container cannot run standalone in Kubernetes it must always run inside a POD.
And then Creating a POD is technically creating a Container
$ kubectl run redis-pod --image=saravak/redis --port=6379 --generator=run/v1 kubectl run --generator=run/v1 is DEPRECATED and volition be removed in a hereafter version. Employ kubectl create instead. replicationcontroller/redis-pod created If you lot look at the preceding snippet closely,
Information technology creates a replication Controller in identify of POD. Just exercise not worry, Replication Controller is there to efficiently manage and scale the POD and it is a layer higher up the POD.
Now Let us validate if our POD is prepare and created.
What is Replication Controller – A Short annotation
A ReplicationController is a Kubernetes resources that ensures its pods are ever kept running. If the pod disappears for whatsoever reason, such as in the event of a node disappearing from the cluster or considering the pod was evicted from the node, the replication controller notices the missing pod and creates a replacement pod.
Step7: Brand Sure the POD is created and Ready.
Using Kubectl get command, Make Sure the POD is created.
Since the Replication Controller is in identify and information technology managed the POD, the POD name would be dynamic
$ kubectl get pods|egrep -i "^Proper name|redis-pod" NAME READY STATUS RESTARTS Age redis-pod-jsrvz ane/1 Running 0 19m Step8: Validate the pod creation and observe more information
Get the status and more detailed information on the newly created POD
aksarav@middlewareinventory: /apps/kubernetes$ kubectl get pods Name Set STATUS RESTARTS AGE hello-minikube-7c77b68cff-pd4x2 1/1 Running 1 elevenh redis-pod-jsrvz 1/one Running 0 2m aksarav@middlewareinventory: /apps/kubernetes$ kubectl get pods/redis-pod-jsrvz NAME READY Status RESTARTS Age redis-pod 1/1 Running 0 2chiliad
$ kubectl describe pods/redis-pod-jsrvz Proper name: redis-pod-jsrvz Namespace: default Node: minikube/10.0.two.15 Start Fourth dimension: Sat, 04 May 2022 nineteen:29:43 +0530 Labels: run=redis-pod Annotations: <none> Status: Running IP: 172.17.0.10 Controlled Past: ReplicationController/redis-pod Containers: redis-pod: Container ID: docker://13d54838011e655ac392065d60da0706f0bf27f4e3b6df11d7a013879a6d52e4 Image: saravak/redis Image ID: docker-pullable://saravak/[email protected]:dc0631a78737b5f0be09ad4c27b0120c916feb06d9bd7ce1fd6890925f5dd42b Port: 6379/TCP Host Port: 0/TCP Land: Running Started: Saturday, 04 May 2022 20:31:22 +0530 Last State: Terminated Reason: Completed Exit Lawmaking: 0 Started: Sat, 04 May 2022 19:29:54 +0530 Finished: Sat, 04 May 2022 twenty:23:46 +0530 Ready: True Restart Count: ane Environment: <none> Mounts: /var/run/secrets/kubernetes.io/serviceaccount from default-token-2fg4d (ro) Weather: Type Condition Initialized Truthful Ready True PodScheduled Truthful Volumes: default-token-2fg4d: Blazon: Secret (a volume populated by a Secret) SecretName: default-token-2fg4d Optional: false QoS Course: BestEffort Node-Selectors: <none> Tolerations: node.kubernetes.io/not-prepare:NoExecute for 300s node.kubernetes.io/unreachable:NoExecute for 300s Events: Blazon Reason Age From Message ---- ------ ---- ---- ------- Normal Scheduled 66m default-scheduler Successfully assigned redis-pod-jsrvz to minikube Normal SuccessfulMountVolume 66m kubelet, minikube MountVolume.SetUp succeeded for book "default-token-2fg4d" Normal Pulling 66m kubelet, minikube pulling epitome "saravak/redis" Normal Pulled 66m kubelet, minikube Successfully pulled image "saravak/redis" Normal Created 66m kubelet, minikube Created container Normal Started 66m kubelet, minikube Started container Normal SuccessfulMountVolume 5m31s kubelet, minikube MountVolume.SetUp succeeded for volume "default-token-2fg4d" Normal SandboxChanged 5m31s kubelet, minikube Pod sandbox changed, it will exist killed and re-created. Normal Pulling 5m30s kubelet, minikube pulling paradigm "saravak/redis" Normal Pulled 5m6s kubelet, minikube Successfully pulled prototype "saravak/redis" Normal Created 5m6s kubelet, minikube Created container Normal Started 5m6s kubelet, minikube Started container Validation: check the newly created pod in Kubernetes Dashboard (GUI) – minikube
run the post-obit command and It will open the dashboard in your default browser
Under NameSpace – Default -> Workloads -> pods
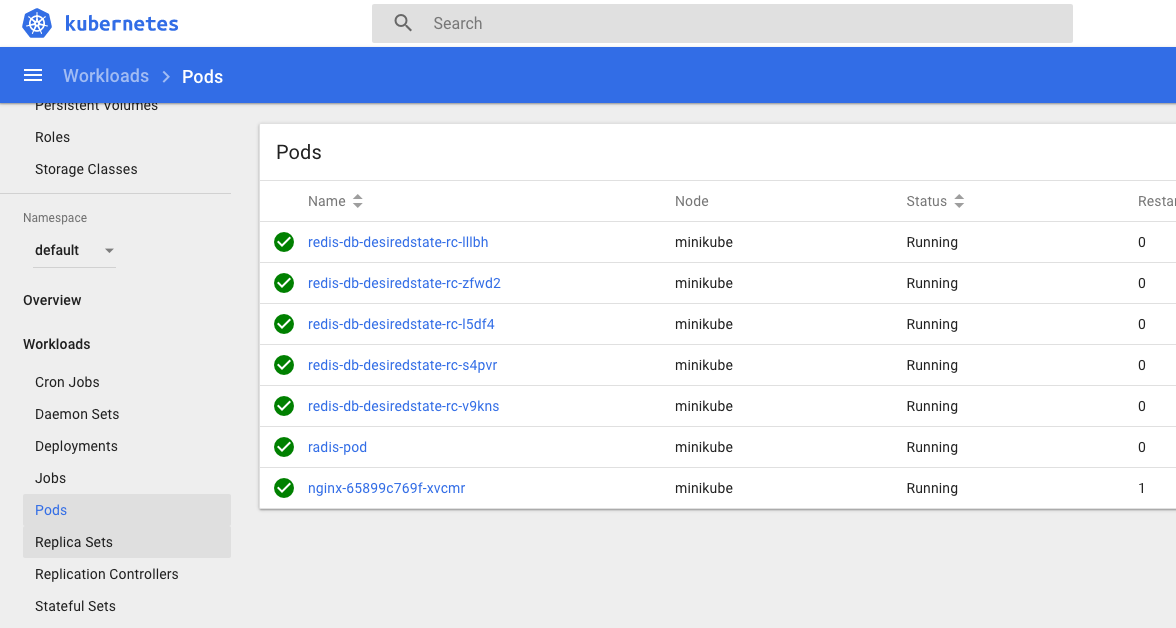
Make Sure that your POD is present.
That'a all this is how we can deploy a Docker epitome to Kubernetes in Eight Elementary Steps.
Hope this helps.
Cheers,
SaravAK
![]()
Follow usa on Facebook or Twitter
For more applied videos and tutorials. Subscribe to our channel
Find me on Linkedin My Profile
For whatsoever Consultation or to hire us [e-mail protected]
If y'all similar this article. Prove your Support! Purchase me a Java.
Signup for Exclusive "Subscriber-only" Content

Source: https://www.middlewareinventory.com/blog/deploy-docker-image-to-kubernetes/
Posted by: thomaspleged.blogspot.com
0 Response to "How To Install Docker Image In Kubernetes"
Post a Comment